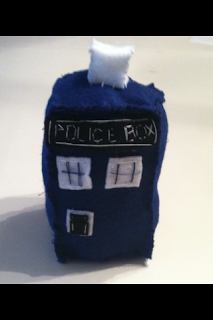
This is my stuffed TARDIS I was inspired to do, this is one of my favorite projects I did, it cute, small and huggable. Lol, anyway you're probably wondering why make this when you can just buy it? Well one is that the Plush TARDIS you can buy are really expensive and most of them don't work, this is a cheap way to have a cute Plush TARDIS for all you skilled Whovains. The one downfall to this project is that it takes a lot of time to make, but if you have a sewing machine it shouldn't take you too long, it took me forever because I hand sewed EVERYTHING! Ugh, i'm exhausted. Anyway I'm so excited I finished this and it was totally worth it, just look how cute this little TARDIS is!!! Anyway, if you're interested in this here's the instructions! Thanks for reading!
And BTW if you're not a sewer you can hot glue these things together, although it won't hold up as good a sewing it would.
First you're going to need 4 pieces of felt, i know there's only 3 in this picture but i forgot to put the other one in it. You need,
1 White
1 Black
2 TARDIS Blue
You can get these from your nearest Walmart or arts and craft store for like 25 cents each.
You'll also need two rolls of string. 1 roll of TARDIS blue and 1 roll of white. You'll also need some pins (To hold your pieces together while sewing) and of course a needle.
And if you're not a sewer you can hot glue these things together, although it won't hold up as good a sewing it would.
A pair of scissors always comes in handy when cutting felts and string.
And although I would recommend stuffing I didn't have time today to get stuffing so I just used tissue, which works great, still soft and fluffy!
Instructions:
1. First fold your blue felt into four rectangular blue pieces. Then cut them apart.
2. Before you do any sewing I would create the windows and Police Box sign. To create the windows just use the blue string and run two lines down close to the center and one across horizontally. Do this four times so that you have four separate windows, two for the front and two for the back. For the Police Box sign. You eyeball a piece of black felt that will run across one of the blue faces, then spell out the words with white string. For the PULL TO OPEN sign I decided to just use some back felt as the 'letters' because it would have been way to hard to try and sew in the words.
3. Sew on the detailed sign, windows and other stuff. Don't forget the back windows!!!
4. Then sew the four rectangle panels together to form something similar to this. Recommend using Blue string so the you can't see it.
5. Once you finish sewing the main walls start sewing in the square tops and the square bulb. To make to light bulb just sew a few pieces of white felt into a small cube then onto the top center of the TARDIS. DON'T SEW IN THE BOTTEM ALL THE WAY! READ 6!!!
6. Once you sewed three sides of the bottom MAKE SURE TO LEAVE ONE OPEN!!! And remember the tissue I was talking about? Yeah this is where you get to stuff your TARDIS! I bet you're like, FINALLY! That's how I was anyway. So make sure to stuff as much as you possibly can. I mean literally, go all out, once you've finished stuffing, sew up the last side of the TARDIS. And there you go! Your little TARDIS is complete!
Front
Now you can sit back and enjoy your cute fluffy TARDIS. I sat for like an hour just hugging it, lol. Anyway hope you liked this project! Comment on how yours went or if you liked this idea, also if you're confused about a step in the project, I really hope you liked this, I spent hours on it. And I hope you come back soon for the next Who Craft!
Back


No comments:
Post a Comment