Search Posts

Tuesday, March 5, 2013

Who Crafts: 11th Doctor Charm


Hello again skilled Whovains! Long time no see! So from Ultimate Whovain Blogger, here's another addition to my Who Crafts. A 11th Doctor Charm! I hope to post all the different Doctors soon (including companions) Once I figure them out, I'll be posting the Dalek charms soon. Hope you enjoy this Who Craft!

What you need:


One thing you really need is oven bake clay. I recommend Crafty Clay, as seen above, one reason is because I've worked with many oven bake clays and this is the higher quality one. Also it's like 10$ for a bunch of different colors and things. It can easily be found at your nearest Walmart or Target.


If you do get the Crafty Clay then you already have these because it comes with it, but you do need crafting tools.


Also foil or a tray or just something to bake the clay on.


Instructions:


1. Now you're going to need these four colors, once you have these and the rest of your supplies out you can move on.


2. Now then take out two small clumps of the dark and light brown.


3. Mix the two till the colors are even yet still let there be streaks of light brown in it, remember this is hair, it needs to be natural looking.


4. Then roll the brown mix into long hair looking strands. Then set aside.


5. Take the pale skin color clay and roll into a sphere.


6. Take the brown strips and layer them onto the head until...


It looks something like this. Set aside.


7. Now take larger clumps of the dark and light brown.


8. Take the light brown and form into a cone like shape.


9. Now take the dark brown and flatten into a round rectangular shape.


10. Shape the dark brown around the cone to form a coat.


11. Now shape the head onto the body.


12. Then take out a piece of red clay.


13. Form the red into a small fez, then place on his head. Then with very little piece of red for the final touch! The Bow Tie!!!! (Bow Ties are Cool!)


Place your little adorable Doctor onto the tin foil and pop him in the oven forever how long your instructions say!

And that's how you make a 11th Doctor charm! I really hope you liked this project! I love him! He sits next to my Sonic Screwdriver on my night stand, lol. Anyway! Comment on how yours went or if you liked this idea, also if you're confused about a step in the project, I really hope you liked this, and I hope you come back soon for the next Who Craft! Thanks!


Monday, March 4, 2013

TARDIS News: Season 7


YES!!!!!!!!!!!!! I am so so SOOOOO excited for the next part of season 7 to come out!!!!!!!!! Just a few more days!!!!!!!!!!!!! YES!!!!!!!!!!!!!!! Anyway I hope you big time Whovains are just as excited as I am because, OOOOHHHHHHHMMMMYYYYYYGGGGOOOOOOSSSSSSHHHHHH  am I excited!!!!!!!!!!!!!!!


I am so sad to see the Ponds go, they were one of my favorite companions!!! I loved them!!! But don't start crying yet Pond lovers!!!! I read and watched a couple of interviews with the brilliant Steven Moffat and heard him say, "They might come back, or they might not, I'm full of surprises." And I was all like, YESSSSS!!!!!!!!! (maybe). I mean think about it!!! They didn't technically die!!!!! Just got sucked back in time! I guess we'll just have to wait and hope for the Ponds return.


Anyway, back at season 7, I'm actually excited about this new companion! When we first meet Oswin in Asylum of the Daleks, I had a feeling she was going to get some sort of back ground story and she was more then just a Human/Dalek. Anyway, when I saw her in The Snowmen, I was really confused but happy to see her again! I was so sad when I found out she was a Dalek, I thought she would have been a great companion, and when I saw she was the new girl I was all like YES!


But how could she die two times? Is she some relation to Captain Jack or something? (BTW ALSO HEARD THE CAP. JACK MIGHT COME BACK TO DOCTOR WHO!!!!) But if she was related to Jack she should remember the Doctor. So many secretes to unlock in Season 7, I can hardly
wait!!!!!!!!!!!


This great new season with mind blowing episodes will be coming out March 30th 2013!!!!!!!! WOHOO!!!!!!!!!!!!

Who Reviews: 11th Sonic Screwdriver

Now this is another Who Review on the 11th Doctor's Sonic Screwdriver, not to be confused with this, A real Sonic Screwdriver screwdriver,


No but we mean this Sonic Screwdriver,


The toy version


Now I love this toy! I mean I got it last week and I can't stop pointing it at my room door every time someone asks to come in. I take it almost everywhere with me, and a night I keep it on my nightstand, you never know if there might be an Angel or a Cyberman lurking about! Any way it's so much fun and I totally recommend it for big Whovain fans, but there are some bad things about this toy,


Although it may look like an exact replica of the Sonic it's not,


See in Doctor Who whenever it opens up the Doctor just has to press a button to make it light up and make the whirring noise wether it's opened or closed. But as you can see in the picture above the amazing Doctor, the bottom of the Screwdriver is opened to a red button that when pressed after the Sonic is opened makes the lighting and sound effect. The Doctor has 3 buttons on the side of his Screwdriver, but we only have two and a big red one on the bottom. That's what stinks about it, see when you want to scan something but leave it all opened up like a claw you have to reach all the way down and press the big red button. It ruins the whole epic Whovain moment that we all know and love!!!


Another thing is the price, I just wish it was cheaper but there are so many Whovains out there it's hard to keep all these amazing things in stock. The one I bought was 25$. I was like, WHAT! But being a true Whovain fan, and looking for it everywhere for the past two days, I had to get it.

They're sold everywhere with all different prices all over the internet. But the one I got was sold at Barns & Noble, ah, good old book stores. Anyway, they can be hard to find but for some reason they're sold at almost every book store, weird.

Do I stamp my approval? Well it's kind of up to you but I guess if you wanted it as much as I did, AND you had the money, then yes. 

I Ultimate Whovain Blogger aprove this Screwdriver.


TARDIS News: Chameleon Circuit


Hello fellow Whovains! This is Ultimate Whovain Blogger here with an awesome dicovery! Actully I dicovered this a long time ago, but when I started this blog I knew I had to include it for some newer Whovains. Ah, I remember being a young Whovain, those were the good old days, actully it wasn't that long ago. But enough about me! Let's get back to what this blog is about! Doctor Who! Well music really, for this post.


Anyway there is an AMAZING fan band called Chameleon Circut. Those of you who don't know why they chose that name it's because that is the name of the cicut that is supose to make the TARDIS change shape. 


The band is so talented and even if it wasn't a Doctor Who band I would still be listening to them. All their songs are based off ethier Doctor Who episodes (Mostly for 10 and 11) or just Doctor Who charicters. Some titles for their songs are,


Big Bang Two

Sound of Drums
The Doctor is Dying
Mr. Pond
Am Awful lot of Running to Do
Blink 
Still Not Ginger
Exterminate Regenerate
Kiss the Girl
And many many more!

Yes I know I sound like an advertisement but I love these songs, and this list is just my favorite ones, you can get these songs on iTunes for like a .99 cents each, oh! There I go again with advertising. No but check them out on youtube, if you are a true Whovain you'll love these, I've memerised all of the Big Bang Two, it's super fast and basicly discribes the whole ep Big Bang, I LOVE it.


 Chameleon Circut's New Album, Still Got Legs


Here is the Big Bang Two song i was talking about, The first one has the lyrics the second one is the video, WARNING!!! SPOILERS TO ANYONE WHO HASN'T SEEN DOCTOR WHO OR THE BIG BANG EPISODE!!!!!!!!!!!!


Sunday, March 3, 2013

Who Crafts: Plush TARDIS


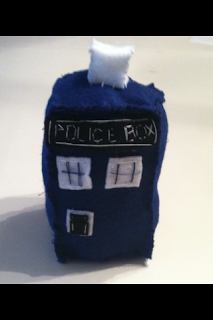
This is my stuffed TARDIS I was inspired to do, this is one of my favorite projects I did, it cute, small and huggable. Lol, anyway you're probably wondering why make this when you can just buy it? Well one is that the Plush TARDIS you can buy are really expensive and most of them don't work, this is a cheap way to have a cute Plush TARDIS for all you skilled Whovains. The one downfall to this project is that it takes a lot of time to make, but if you have a sewing machine it shouldn't take you too long, it took me forever because I hand sewed EVERYTHING! Ugh, i'm exhausted. Anyway I'm so excited I finished this and it was totally worth it, just look how cute this little TARDIS is!!! Anyway, if you're interested in this here's the instructions! Thanks for reading!

And BTW if you're not a sewer you can hot glue these things together, although it won't hold up as good a sewing it would.


First you're going to need 4 pieces of felt, i know there's only 3 in this picture but i forgot to put the other one in it. You need,

1 White 
1 Black
2 TARDIS Blue

You can get these from your nearest Walmart or arts and craft store for like 25 cents each. 


You'll also need two rolls of string. 1 roll of TARDIS blue and 1 roll of white. You'll also need some pins (To hold your pieces together while sewing) and of course a needle.

And if you're not a sewer you can hot glue these things together, although it won't hold up as good a sewing it would.


A pair of scissors always comes in handy when cutting felts and string.


And although I would recommend stuffing I didn't have time today to get stuffing so I just used tissue, which works great, still soft and fluffy!


Instructions:

1. First fold your blue felt into four rectangular blue pieces. Then cut them apart.


2. Before you do any sewing I would create the windows and Police Box sign. To create the windows just use the blue string and run two lines down close to the center and one across horizontally. Do this four times so that you have four separate windows, two for the front and two for the back. For the Police Box sign. You eyeball a piece of black felt that will run across one of the blue faces, then spell out the words with white string. For the PULL TO OPEN sign I decided to just use some back felt as the 'letters' because it would have been way to hard to try and sew in the words.


3. Sew on the detailed sign, windows and other stuff. Don't forget the back windows!!!


4. Then sew the four rectangle panels together to form something similar to this. Recommend using Blue string so the you can't see it.


5. Once you finish sewing the main walls start sewing in the square tops and the square bulb. To make to light bulb just sew a few pieces of white felt into a small cube then onto the top center of the TARDIS. DON'T SEW IN THE BOTTEM ALL THE WAY! READ 6!!!


6. Once you sewed three sides of the bottom MAKE SURE TO LEAVE ONE OPEN!!! And remember the tissue I was talking about? Yeah this is where you get to stuff your TARDIS! I bet you're like, FINALLY! That's how I was anyway. So make sure to stuff as much as you possibly can. I mean literally, go all out, once you've finished stuffing, sew up the last side of the TARDIS. And there you go! Your little TARDIS is complete!


Front

Now you can sit back and enjoy your cute fluffy TARDIS. I sat for like an hour just hugging it, lol. Anyway hope you liked this project! Comment on how yours went or if you liked this idea, also if you're confused about a step in the project, I really hope you liked this, I spent hours on it. And I hope you come back soon for the next Who Craft!


Back


Translate